 Skip to content


Water, water everywhere, so let all have a drink!
One bottle? Maybe two? How about a hydration bladder in a backpack or a frame bag? WHERE AM I GOING TO PUT MY WATER!?!? When planning your first bikepacking adventure, deciding how much water to bring and where to store it can drive a person crazy. It did for me on my first outing. But before we talk about how to store your water, let's do a quick dive into how much to bring.
How much water do you need?
Baseline, I always make sure to carry at a minimum of 2 liters of water for a full day of backpacking, and then I follow the chart below:

*Based on my personal needs and many vary by person
If I max out my needs according to this chart, I will need to store up to eight liters of water, and water is not light at 2.2lbs (1000g) per liter. So how does someone carry over 15lbs of water? Well, let's look at some storage solutions.
What are your options for storing water?
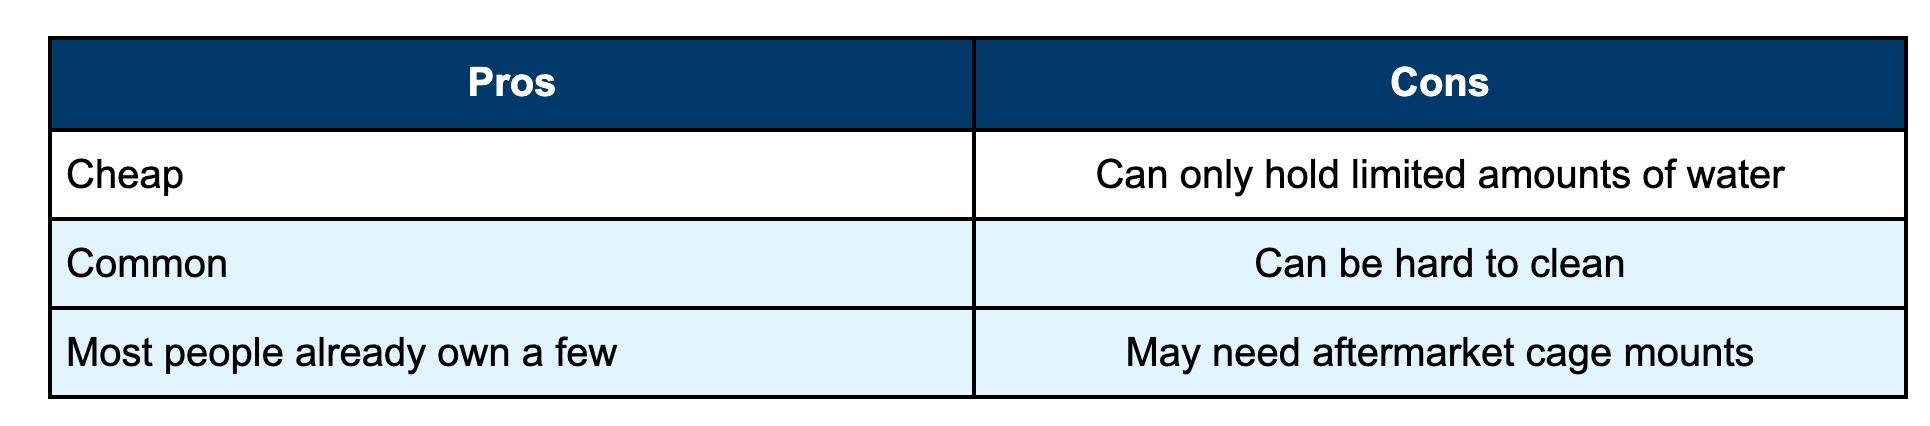
1) Cycling Bottle and Cages, free-$10
Cycling bottles are cheap, easy to come by, and odds are you already have a few lying around, and I always bring at least two cycling bottles with me on every trip. One bottle will only be filled with a water/electrolyte mixture, while the other will only have water. This way, one always stays clean.
The only downsides that cycling bottles have are capacity and that the bottles can be tricky to clean in the field. This is why I make sure only one bottle will have an electrolyte mixed in it. Also, some bikes only have attachment points for one bottle cage, which can be limiting. The good news is that many after-market kits can add bottle cage mounts to your bike frame, such as the Wolf Tooth B-RAD system.
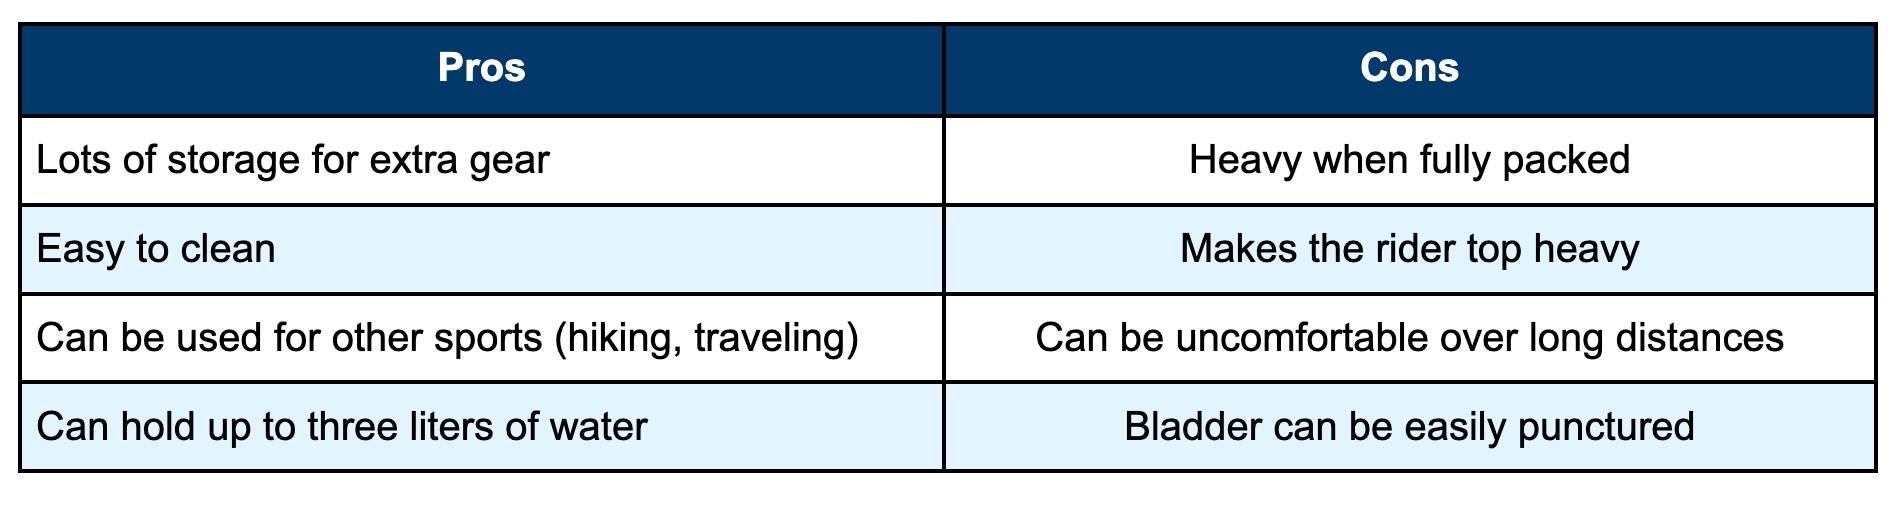
2) Hydration Packs, $30-$70
Hydration backpacks are another solution used to store water and extra supplies. Most packs have bladders that can hold up to three liters of water accessed via an attached hose/straw. Some bladders even offer a roll-top that make cleaning and filling extremely easy.
The packs are also great for carrying extra gear, food, and supplies, but this could start to get heavy. When fully loaded, a pack can weigh over 7lbs (3175g), and that much weight on your back can begin to get uncomfortable. This can also cause your back to start sweating and causes more dehydration. There are small fanny packs with built-in bladders that are better suited for day trips, but I find having nothing attached to me to be the most comfortable. Another feature for hydration packs is that the bladder is removable in most and can be placed on other parts of the bike, such as in a frame bag. When doing this, you will need to ensure that you have the space and that nothing sharp is placed next to the bladder since they can easily be punctured. If the bladder is your primary storage solution and becomes punctured, your trip may be ending early.
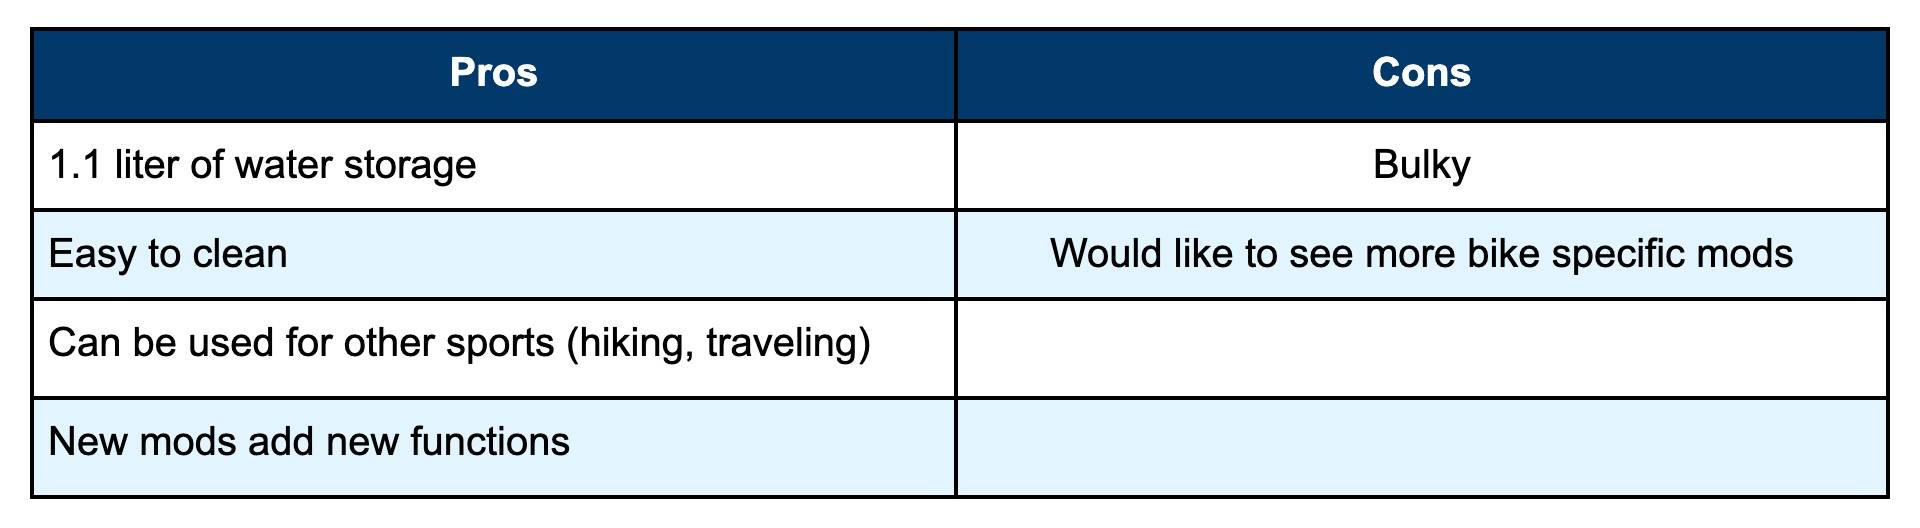
3) MODL Water Bottle, $39
This one was a surprise when I first came across it last year. The MODL is a silicone bottle that has swappable caps called MODs that give it new functionality.
The basic MODL is a durable and flexible 1.1 liter water bottle that opens from both ends for easy cleaning and includes two stretchy loops (SuperLoops) on each end. The two loops allow you to connect your MODL to almost any point on your bike or to your bike bags. I prefer attaching the MODL to my front handlebar bag with the loops and a few extra bungee cords. It's a tight fit but won't budge at all.
The two MODs that I recommend the most for bikepacking would be the Flow and Pure MODs. The Flow MOD is a drinking hose, just like a hydration bladder. This allows quick and easy access to drinking the water while riding. The Pure MOD is also great for people bikepacking in areas without access to clean drinking water. It's a water filter that lives inside your MODL and can connect to your Flow MOD.
As for the negatives for the MODL, there are not many. While the bottle can bend and form to its surroundings, it's still pretty bulky. This is not a huge issue since it lives outside of your bike, but you may run into problems if you want to keep it in a frame bag. Also, I would like to see more ways to attach the MODL to my bike, such as a webbing sleeve for more attachment points. I know the team at MODL are coming up with new MODs, and I can't wait to see what will be released next.
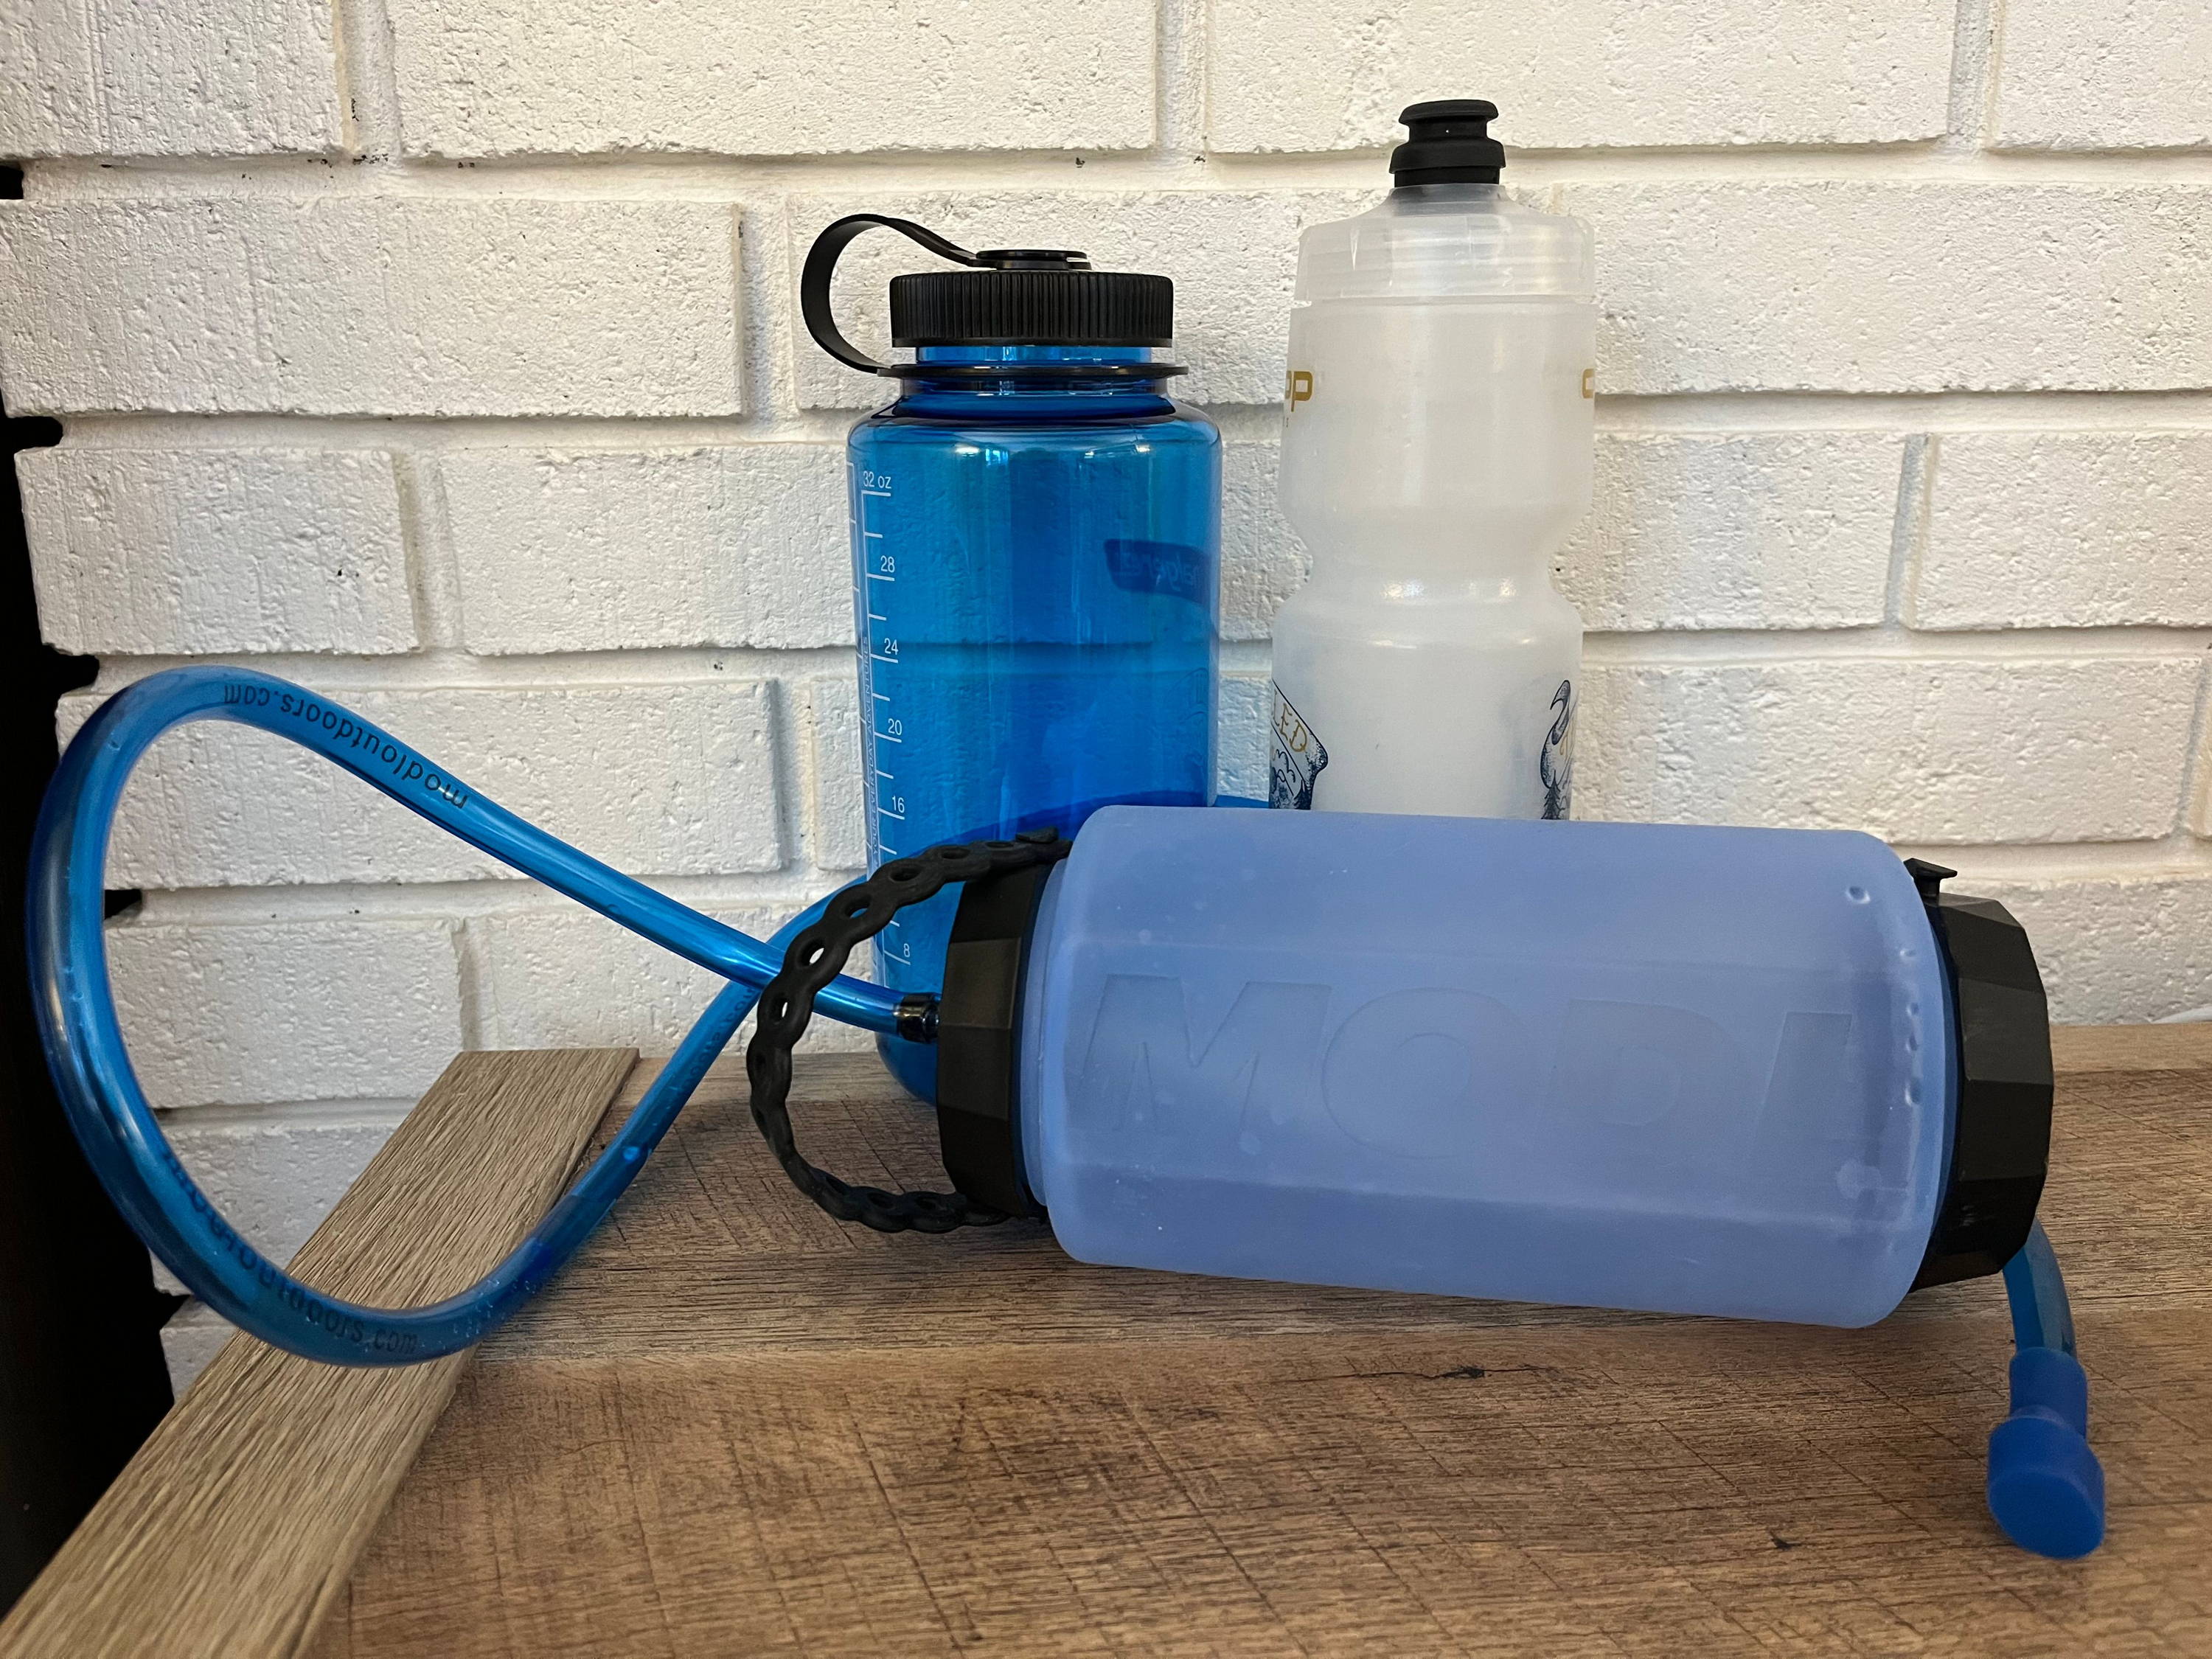

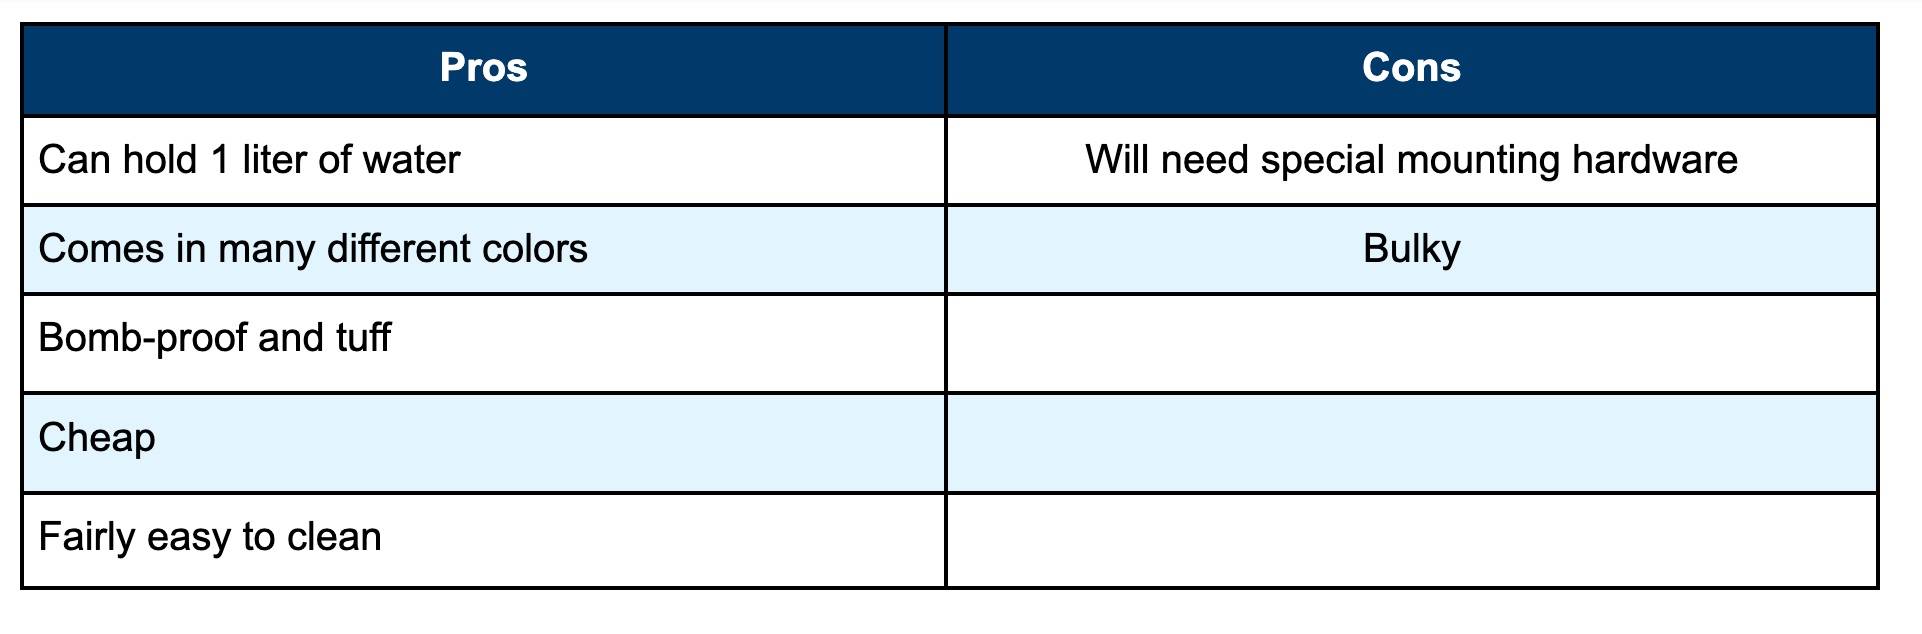
4) Nalgene, $13
The well-known and trusted Nalgene bottle makes for a great bikepacking companion.
The average size Nalgene bottle can hold just under one liter of water and is relatively light for its size. You can buy one in almost any color or pattern, and if you still can't find one you like, you can slap some stickers on the bottle and make it your own. I also recommend the wide mouth tops for easy cleaning, though you may still need a bottle brush.
I find that the best use for a Nalgene is as your emergency reserve water storage system. The bottles are bomb-proof, simple, and cheap and make them perfect for living on the belly of your bike. Unfortunately, that's where you see the downsides.
Nalgenes are big, bulky, are hard to mount to your bike. You will need a special storage bag or a bottle cage explicitly designed for Nalgene bottles. Also, not all bikes have bottle cage mounting points on the underside of their downtubes, so you may need an adapted to go with your custom bottle cage.
So, how do I carry my water while on the trail?
I use a combination of the above products depending on the scenario. On my average trip (2-8 days with plenty of drinking water sources), I would bring:
- 2 Cycling bottles attached to fork-mounted cages or stem bags
- 1 MODL with the Flow MOD for drinking while peddling
- 1 Nalgene as my extra/reserve water
Total water - 3.5 liters
If it's warmer or I know that I won't be near any stops with fresh drinking, I may replace the fork-mounted cycling bottles for much larger Nalgenes and use them to refill my MODL
In the end, this is what works best for me. I like keeping all weight off my back and my water out of my bags. This lets me have more room for gear and, more importantly, snacks.
Cheers, my friends, and stay hydrated!
This blog post was written by Mike DiPasquale, an awesome bikepacker, father and overall dope human.